FAQ
Getting Started
Lyfshort is a free Trip & Event planning app for individual or private group use.
Download from the App Store (iOS) or Google Play (Android) or visit https://app.lyfshort.com and log in with a web browser.
Typically managing and sharing information and communication when planning group Trips or Events is a headache. Many people resort to using a range of disconnected apps, social media platforms, spreadsheets etc. accompanied by a spaghetti of email, SMS and messaging threads, none of which are really designed for this purpose.
Lyfshort helps plan, store, and manage Trip & Event information in an itinerary format. It also centralises sharing and communication with friends along with participant invitations, access and expense management and group messaging.
Efficiently manage your online research, times, dates & time zones, location mapping, budgeting and expense tracking, supplier bookings, group participants, photo and PDF sharing, messaging and communication, all in one place.
Lyfshort … Dream, Plan, Do!

Your profile screen is accessible from the draw menu in the top left hand corner. It contains key information you create and share with Lyfshort to facilitate login in and use of the service.
Profile information is not available or visible publicly however some elements are used to identify you to other Lyfshort users when you choose to participate with them as part of a private group. These include : –
- Avatar Image
- Username
- First Name
- Last Name
To invite or be invited to a private group related to an itinerary, you must know or have been provided one of the following pieces of information:
- Username
- Email Address
- Received a 1 time link for a Trip or Event
The default currency setting for expenses and the logout button are also available in the profile screen.
This is the main screen used in Lyfshort. It displays all the Trips and Events you are involved in (as an owner or participant), each item is grouped and presented in an itinerary format. The list is scrollable in date order with upcoming Trips or Events at the top and past ones at the bottom.
From here you can manage or contribute to each item by pressing on its name. This will open a more detailed view to perform actions relating to each specific item such as editing times, dates and other details along with research, group management, messaging, mapping, expenses and sharing images, bookmarks and PDFs.
Owners/Co-owners and Participants have different access rights. Owners/Co-owners have full admin access. Participants cannot edit item details, invite and manage participants and control what Participants can view.
New itinerary items can be created by using the green “+” in the bottom right hand corner.
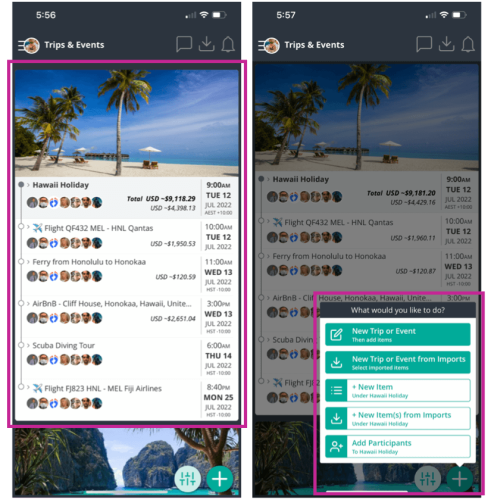
An itinerary is made up of 2 levels of linked items, a top level parent item (usually the overarching Trip or Event name), and all the associated second level children items underneath (usually things that will happen Eg. flight, accommodation, activity, restaurant, meetup etc.).
The top level parent item groups everything together as an overall theme, has a selectable feature image and the ability to automatically include participants in all existing and future second level items under it.
Both levels of items are created by pressing the green “+” button at the bottom right of the screen. Second level items will automatically be linked to the top level Trip or Event you were last in. Its name will also dynamically appear in the “Add Item” button prior to proceeding.
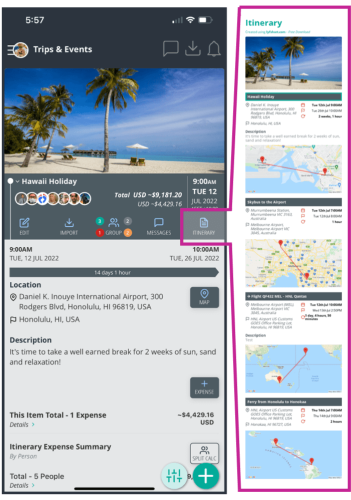
A full itinerary can be viewed from the list screen by pressing the top level Trip or Event name which will reveal an “Itinerary” button on the right hand side. From here an “Export” option is also available.
EXAMPLE :
(1st Level Trip or Event Item) – Trip to Spain
(2nd Level Item) – Outbound Flight
(2nd Level Item) – Accommodation Check-in
(2nd Level Item) – Restaurants
(2nd Level Item) – Recreational activity
(2nd Level Item) – Accommodation check out
(2nd Level Item) – Return Flight
Itineraries can be created by manually adding each item OR using imported email confirmations OR a combination of both. Use Imports by :
1. Pressing the import manager icon in the header
2. Pressing the import manager icon from within an item
3. Selecting import options in the green + button menu
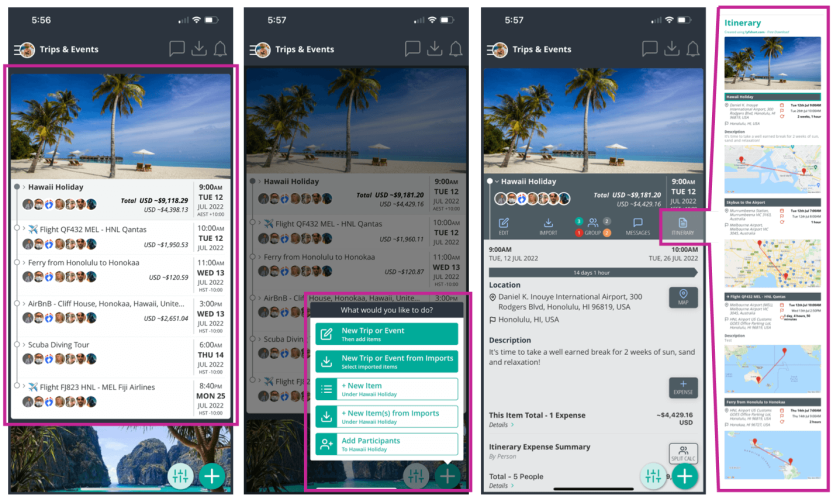
Lyfshort makes it easy to manage one master itinerary across ranges of different suppliers. Itinerary Items such as flights, accommodation, trains, transfers, activities, parking, cruises, buses, events, ferries etc. can be imported by forwarding supplier confirmation emails you receive to go@lyfshort.com
They will then be visible within the Import Manager of the Lyfshort account with the matching registered email address the one the emails were forwarded from.
The Import Manager is accessible within Lyfshort by :
1. Pressing the Import Manager icon in the header
2. Pressing the Import Manager icon from within an item
3. Using the bottom right green + menu button on the main Trips and Events list screen
Once the email has been forwarded the content will be scanned to create single or multiple Import Document(s). Their content is then used to automatically :
1. Create new Trips or Events
2. Create new Items
3. Update existing Trips or Events
4. Update existing Items
5. Associate and Attach to existing Items
Import Documents can be created for most supplier emails however scanning relies on the information forwarded to the Import Service being :
– From a recognised supplier
– In a standard format
– In a recognised language
Once an email is successfully received it will be visible in the Import Manager. As the scanning process occurs it’s status will appear as “Pending”.
Import Documents typically take a few minutes to appear following the email, however if manual review is required, can take up to a few days.
If the scanning process is successful the new Import Document(s) will appear for use below the forwarded email.
If the scanning process is unsuccessful and the Import Document(s) cannot be created, the status flag will change from “Pending” to “Unsuccessful”.
Irrespective of whether scanning and creation the Import Document is successful, the forwarded email (.PDF) and associated files will still also be available to view and attach to itinerary items from the Import Manager in Lyfshort.
Within a Lyfshort activity there are 3 roles.
1. Owner
2. Participant
3. Co-Owner
An OWNER is the initial creator of the activity, has read and write access to everything, can invite anyone to the activities they created, allocate Co-owners and delete the activities they created.
A PARTICIPANT is an invitee to the activity. They typically receive an invitation to participate in the activity, sent by an Owner or Co-owner through Lyfshort (push notification), email, SMS or social link. A Participant can then review details like date, location, other linked itinerary activities, other participants and choose to say Yes/No or Maybe within Lyfshort activity list. Participants cannot edit core activity details such as time, date, location, feature image, financial details etc. however they can send messages, upload and download images and save bookmarks within the group. Participants are unable to invite other people to the activities in the private group. If they would like to do any of these things it is suggested using the messaging function, communicating with the activity owner and/or request being upgraded to a Co-owner. A Participant can be upgraded to a Co-owner once they have created a Lyfshort profile.
A CO-OWNER has similar rights to the owner however cannot delete the activity. Typically they are allocated to help the owner manage certain activities in the itinerary. There can be multiple Co-owners for each activity. They are created by an owner opening an existing participant listed on the “Group Participants” screen and changing the setting from “Participant” to “Co-owner”.
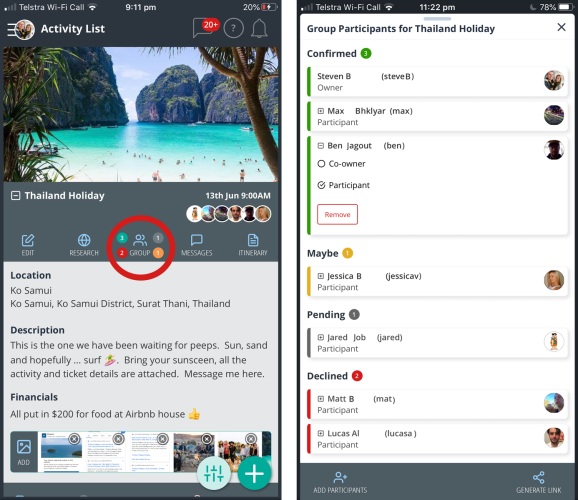
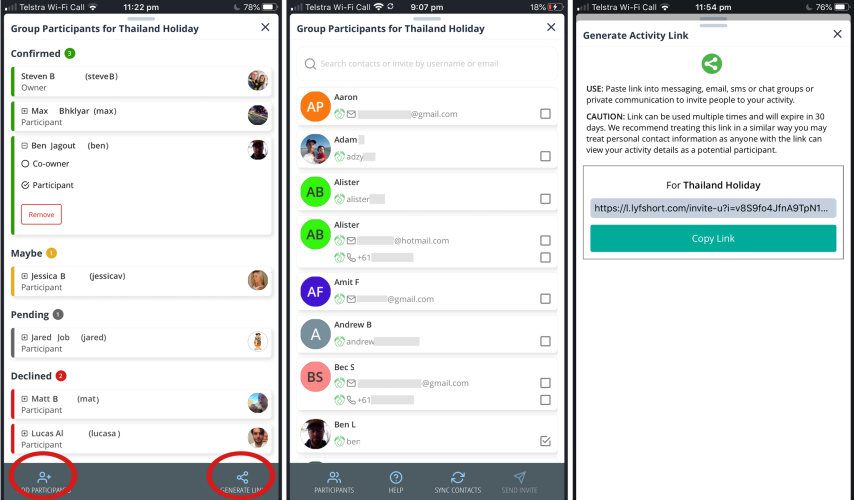
Owners and Co-owners can Invite activity participants in 3 ways :
Individually : The exact Lyfshort username or email address can be entered into the search box. A green dynamic button will appear below. Press it to invite individually.
Contact List : By pressing “Sync Contacts” Lyfshort provides a selectable list based on the contacts stored on your device. Invite multiple contacts at once by selecting usernames, Mobile numbers (SMS) or email addresses from the list then pressing the “Send Invite” button. If a contact does not appear on the list update their details in your devices contacts and press “Sync Contacts” again.
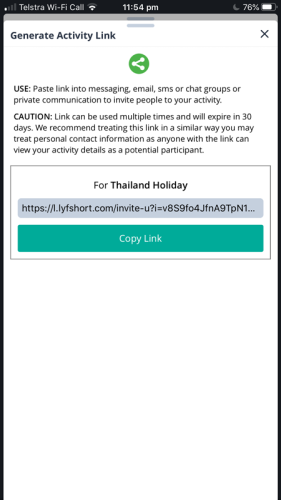
Invitation Link : Generate a unique activity link from the group screen. This link can be copied and pasted into most digital communications such as messaging, chat groups, SMS, email etc. This will allow people with the link to view and join the activity as a participant.
Anyone invited to an itineraries “Main Parent Item” will automatically be included in all current and future “Child Items” created underneath it.
Similarly, Co-owners in the Main Parent Item will automatically become Co-owners in all current and future Child Items created underneath it.
Participants can be invited to specific, individual Child Items or upgraded to Co-owners in specific, individual Child Items, providing they are not already included in the Main Parent Item.
If an Owner or Co-owner wants to remove a participant from specific, individual Child Item(s), not the whole itinerary, they must first be removed from the Main Parent level Item and re-invited to these relevant Child Items.
Each itinerary has it’s own items. Each item has it’s own participant group.
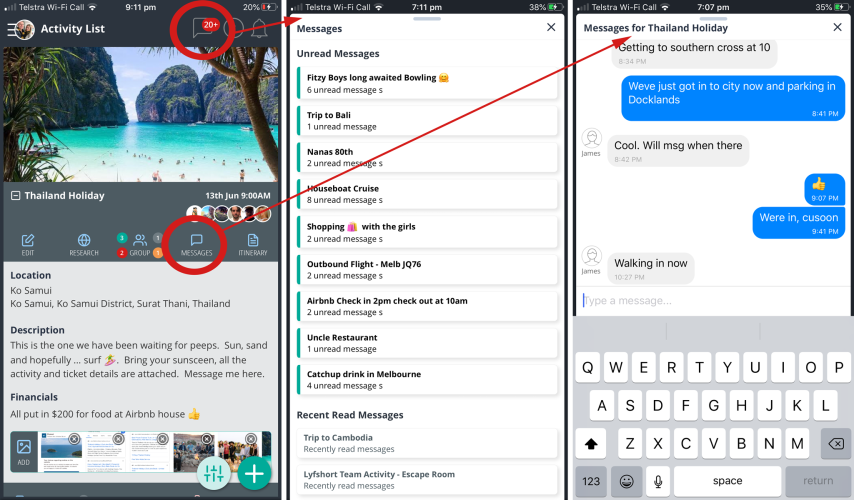
When group messaging is used from a specific item the thread will automatically be saved and linked to it, forming it’s own conversation channel. This helps both focus conversations and find relevant conversation details in the future.
There is also an overall view of all conversations you are participating in, listed by item available by pressing the message icon in the header.
Times and dates of items are set either during creation or through the edit button once an item appears in the Trip or Event list. 3 options are available for both start and end. Date, Time Zone and Time. The duration will be automatically calculated based on the entry. If no end time is specified 1 hour will be automatically added to the start time.
Lyfshort leverages Google maps integration to help set start and end locations for itinerary items.
Locations are set either during creation or by pressing the Map button in each item in the Trip or Event list.
Locations can be changed at any time and also set by touching on a map to drop a pin. When start and end locations are selected a direct line will be marked between the 2 pin points.
When travelling a Google navigation option is also available by pressing the arrow button on the map screen. This will automatically open and populate the Google mapping App, ready for route guidance.
Budget, track and manage expenses, both individually or across a private group.
Individual expenses can be entered for each Item in any currency with the sum total displayed in a preferred home currency.
All expenses for all items roll up as an itinerary wide total, summarised by person, viewed in the top level Trip or Event Item.
170 global currencies are supported with the home currency selected via a setting on the profile screen.
Enter an expense by opening an Item and pressing the “Expense” button. Then :
1. Choose yourself or anyone in the Trip or Event group to allocate the expense to
2. What currency the expense is in
3. Amount
4. Details of what the expense is for
Owners of an Itinerary can also choose to remove normal group Participant access for viewing and adding expenses. This is done by changing the “Group Settings”. If there are individual Participants the Owner would still like help manage expenses (besides themselves) they can upgrade each one from a “Participant” to “Co Owner” by pressing their name and changing their status in the group screen.
Common uses for expense management include :
– Budget planning before a trip
– Tracking expenses individually during and after a trip
– Recording and viewing expenses across a group
– Tracking and splitting costs across a group
– Estimating how costs convert to local currency
An expense split calculator is available for any Itinerary with an expense.
To use it open the top level Trip or Event item for the itinerary. You should see an “Itinerary Expense Summary” which provides a list of all the people in the group that recorded expenses along with a total. Next to the total should be a “Split Calc” button.
Open the calculator, it automatically takes the itinerary total and balances it evenly between the specified number of people. It also calculates the individual sub-total balances for each person based on what they have already paid. The number of people that have already recorded expenses is the minimum number available. Additional people can be added by pressing the + button, with each person’s individual subtotal automatically recalculating.
The content of the calculator is populated dynamically, directly from expenses entered within the itinerary, so very quick to use however not saved for each scenario.
Within each item Participants can upload, view and download to the Image library. This may be to share research screen grabs, quotes or inspirational pics before a trip or share photos together as a group during or after. Also because images are actually saved in the itinerary item, not only are they are quick and easy to find and socialise, all the contextual details such as messages, participants, locations etc. are stored with them … great for recall, months or years later.
PDF documents can be saved and associated with each itinerary item. They can be attached by pressing the + document button above the image library. Once a document is attached, it’s name will appear below the image library along with a link to open it using the viewer within Lyfshort. If multiple documents are attached to an item they will appear as a list.
Lyfshort users can forward supplier confirmation emails to go@lyfshort.com and they will become available within the Import Manager area of the app. (See “Importing Itinerary Items” for more detail)
To use this service the registered email address contained in the users profile and the email address they were forwarded from must match.
The content will then be scanned and turned into a Lyfshort Import Document which supports the automated processes within Lyfshort.
Irrespective of whether scanning and creation of the Import Document is successful, the forwarded email (.PDF) and associated files will still also be available to view and attach to itinerary items from the Import Manager in Lyfshort.
Pressing the email button above the Image library in an item will open the Import Manager list of email content that has been forwarded. Now select the relevant content to attach to the item.
Within each item Participants can share a central list of bookmarks. This is particularly handy during the research stage for swapping ideas, quotes or inspirations.
The bookmarks are automatically stored within the specific item record for easy reference.
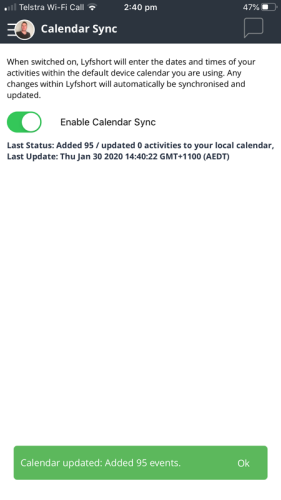
Calendar Sync automatically takes the information created in Lyfshort and synchronises it with the selected, existing calendar on the mobile device you are using Lyfshort on. This will happen in the background as you add new items and change existing ones. It can be switched on and off and when switching off the option to remove items written to your calendar is available.
Note : Calendar Sync is not available on the Web App version of Lyfshort at this stage.
Lyfshort supports a range of notifications to let you know whats going on. Some include :
- Import Received
- Import Ready
- Invite Received
- Invitation Accepted
- Item Added
- Item Detail Change
- Message Received
A notification feed for items you are participating in is accessible in 2 places, the draw menu and a bell icon in the header.
Most notifications can be viewed here in a dated journal format. Some have a link to the item the notification relates to and some trigger a badge which is displayed with the bell icon in the header.
A full itinerary view can be exported from within the top level Trip or Event Item by pressing the “Itinerary” button. (Note – This is only available in the Parent level Item not second level Child Items) . A Summary or Detailed view can be selected prior to export.
The Itinerary will be exported as an image and automatically saved in the camera role of your mobile device or to your downloads on a computer.
This can be used for printing, offline reference or to attach and send.
Frequently Asked Questions
Lyfshort’s® free travel App solves one of the biggest pain points when organising trips or group activities … managing information and communication in one place.
Join our user community managing tens of thousands of recreational trips all around the globe today.
Individual or Private Group Use
Manage Master Itineraries
Import Supplier Bookings
Integrated Location Mapping
Invite & Manage Participants
Track & Split Expenses
Save & Share Photos & Documents
Group Messaging Channels
All in 1 place
Download and install the Lyfshort App from the Playstore or Appstore and complete the requested details. You will then create a unique Lyfshort username that can be provided to other Lyfshort users to join activities.
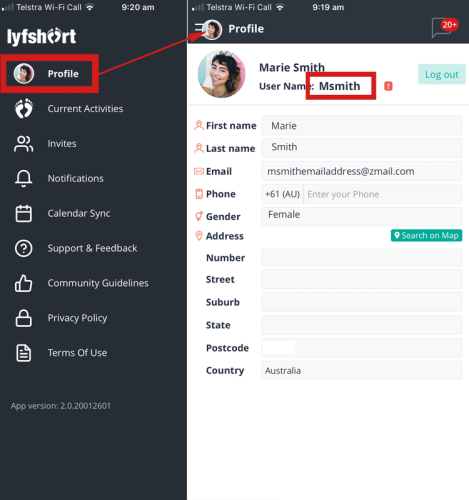
When you create a Lyfshort profile you will receive a unique Lyfshort username. If you are logged in to Lyfshort your username can be located at the top of the profile screen. This can be accessed by navigating to the “Profile” section in the draw menu.
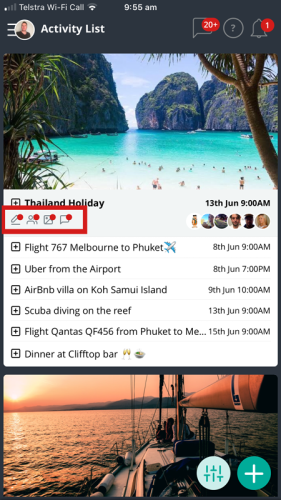
As the Owner is updating activity details, the group is sharing bookmarks, images, messaging each other, invites are going out, responses coming back … it’s quite a bit to keep track of if you had to open each activity all the time. These badges tell you at a glance whether there has been an update to an activity and gives you an idea whether it’s worth taking a look.
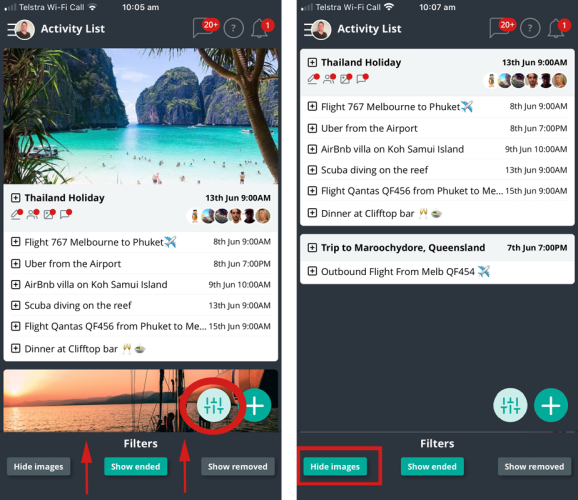
Press the light green filter button at the bottom right of the screen and select “Hide Images”. This will hide all the Main activity feature images and provide a text only view. You may want this to fit more on 1 screen.
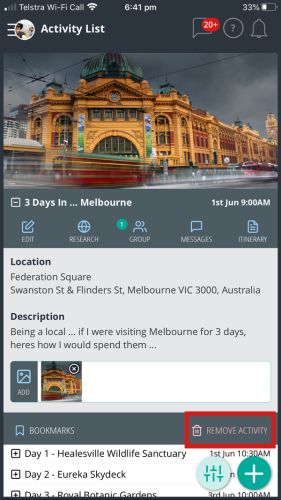
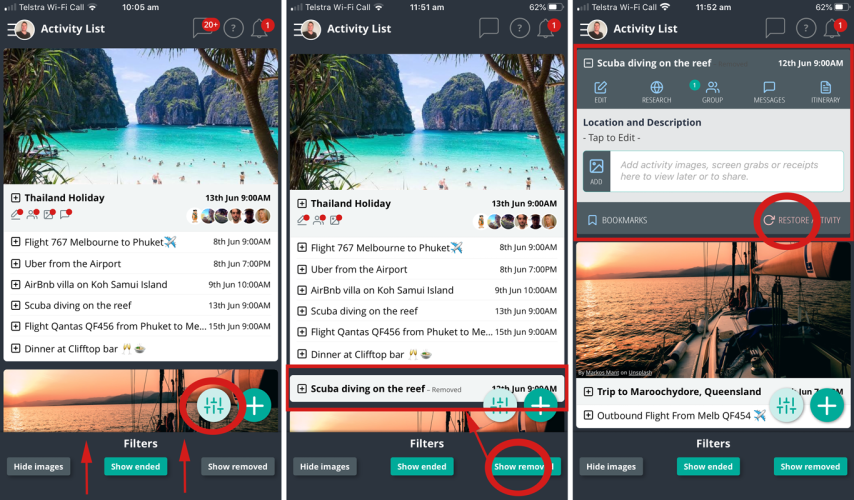
Press the light green filter button at the bottom right of the screen and select “Show Removed”. This displays all the past activities that have been removed from the activity list view. To recall them open each activity and select the “Restore Activity” icon.
30 days. After this time it will expire and can no longer be used.
No, Lyfshort is a flexible, supplier independent utility to help manage all your own end to end details in 1 place.
Once you have booked you can then Import supplier information by sending it to go@lyfshort.com and have it appear in 1 simple Master Itinerary.
Calendar sync is setup so the Item dates and times you create in Lyfshort Itineraries will be synced and written to a calendar you select on the mobile device you are using Lyfshort on.
This will happen in the background as you add new activities and change existing ones.
NOTE : This feature is not available through the web browser version.
PROBLEM
When you are invited to an activity by another Lyfshort user they have 4 ways of sending invitations :
- SMS
- User Generated Link
- Lyfshort User Name
The first 3 Lyfshort invitation types above use deep link automation making it easier for users to send and receive invitations. Sometimes the security and privacy features enabled on web browsers can interfere with this automation, meaning the activity will not show up in your Lyfshort app after clicking on email/SMS/user generated links.
SOLUTION
There are 2 ways to get around this issue :
- Whitelist “app.lyfshort.com”
Add the domain to your web browsers whitelist. This location will then be flagged as a trusted provider and let the data for the link automation through. To do this you will need to locate the extension or function in your web browser that control the security and privacy settings of these connections and add app.lyfshort.com. - Invite by Lyfshort Username
Once you have created a profile with Lyfshort, ask the owner of the activity to invite you by “Lyfshort Username” rather than using a link required in the first 3 invitation types above.
Your username is at the top of your profile screen.